Tuesday, July 17, 2012

The Classic Testor's Corsair, Reserved

Over at the Replica in Scale blog a few weeks back, I stumbled upon a treasure trove of images of post World War II Corsairs. In the entry "The Last of the Deltas, Studies in Glossy Sea Blue, The Infrequent Model, Mystery Meat,and A Salute to the Cat", there is a section titled "Can You Hear Your Bluebird Sing?". There, you'll find an image of a Goodyear FG-1D Corsair in Navy Reserve markings at NAS Grosse Ile, Michigan, sometime in the late 1940's or early 1950's. 


There is nothing special about the plane, except for the fact that its markings are not quite standard. Clearly, the Corsair had seen better days, but it was inspiring in spite of its plainness. 
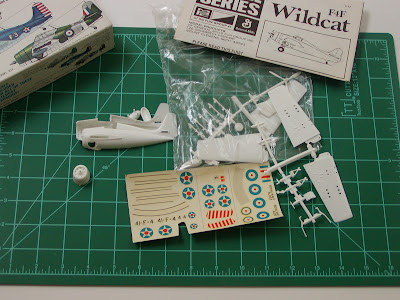
I decided to model this Corsair as an experiment of sorts using the classic Hawk/Testor's kit. First off, I decided to use an old favorite color of mine, Testor's Flat Dark Sea Blue, number 1172. When I was a teenager, I frequently used this color on US Navy aircraft of that period. Many purists twinge at the thought of using a color that is not quite a match, but in this case, it was justified; it looks slightly faded, as the Corsair does in that photo.
The next part of the experiment was to see how much detail could be eked out of the model using the barest minimum. In this case, that would translate into opening up the wing inlets, adding a little detail to the wheel wells and landing gear, and opening up the cockpit and adding a simple seat.
I chose to tackle the wings first. Opening up the wing inlets was a simple task accomplished with a file and X-Acto knife. Detail was cobbled together from scrap plasticard and an unusual corrugated Mylar ribbon I picked up nearly twenty years ago, and which still appears at some craft stores from time to time.


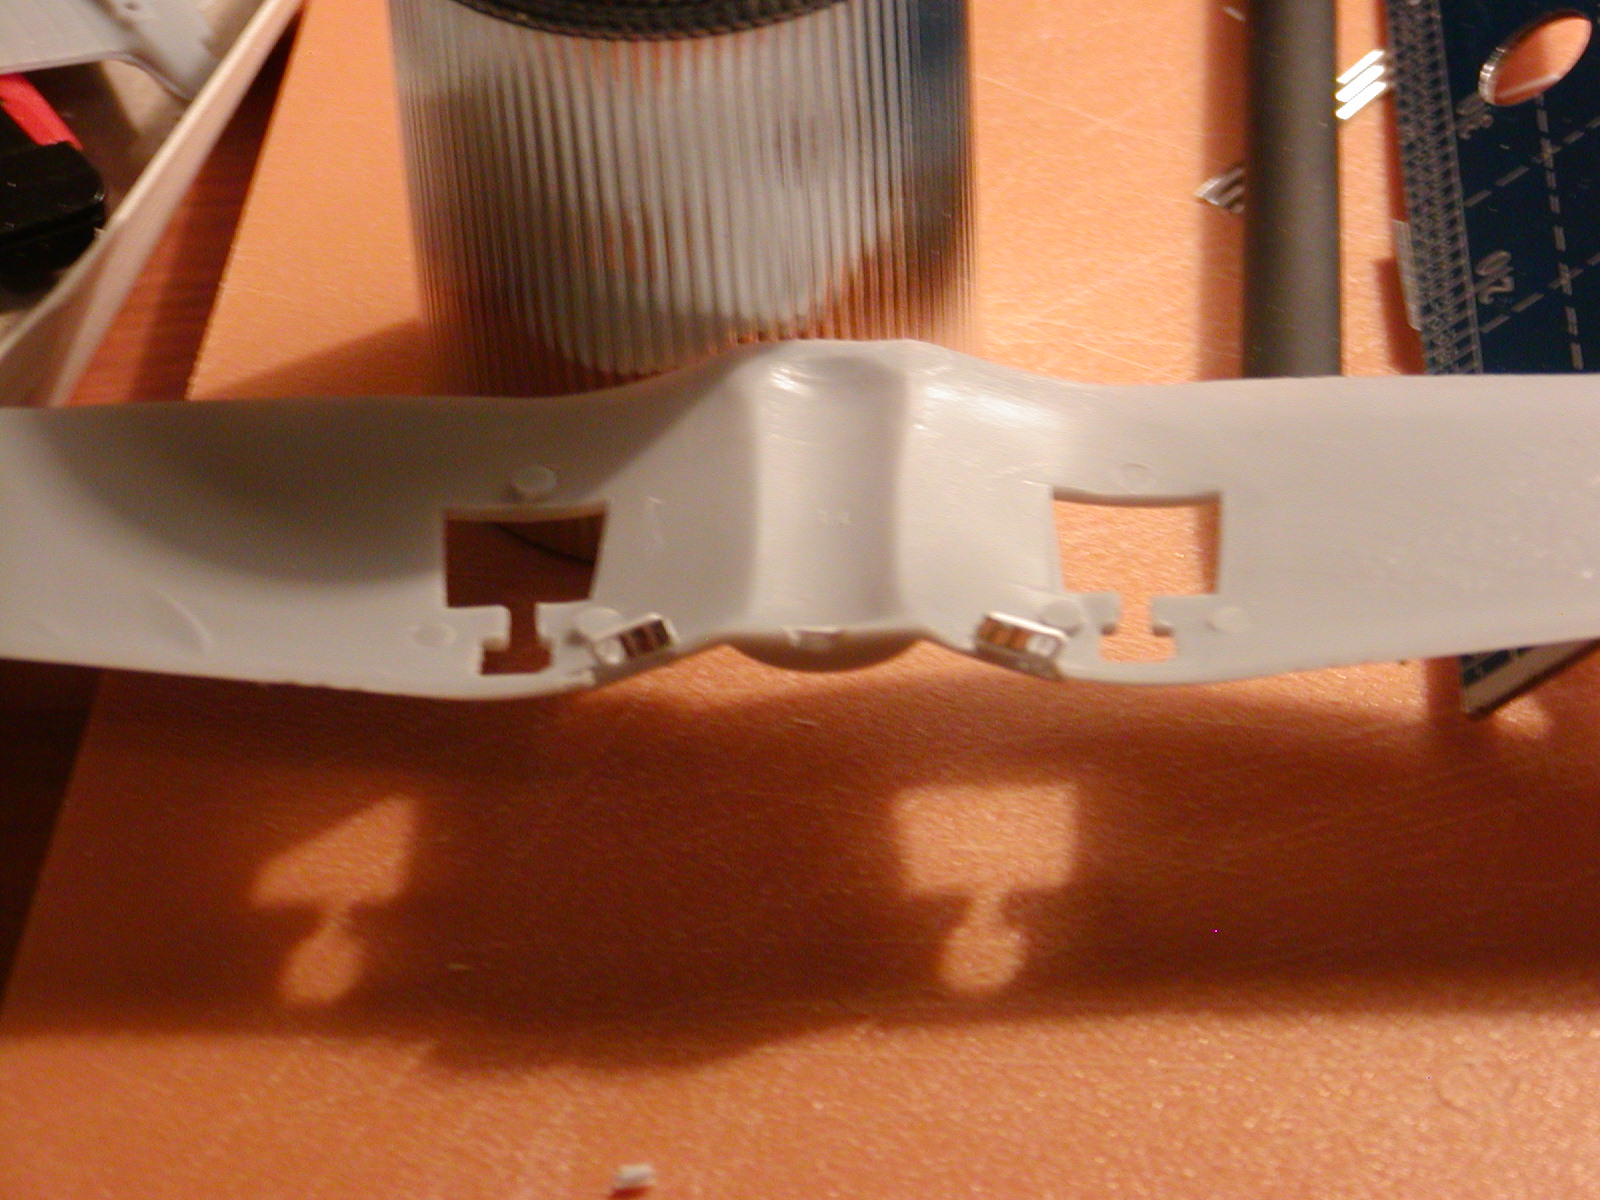
I used the same ribbon material to detail the wheel well interior.


Opening up the cockpit was a relatively simple task, made easy with knife and file as well.


One thing I did notice about this kit. There were a number of minor short shots in the molding, as can be seen in the above image. These were easily taken care of with putty. One short shot, however, was a bit problematic if I had not planned on modifying the model's landing gear; the rear struts were short shot, something I did not discover until I began work on them. These were due to be cut and moved up the gear, however, so they really weren't a problem. 
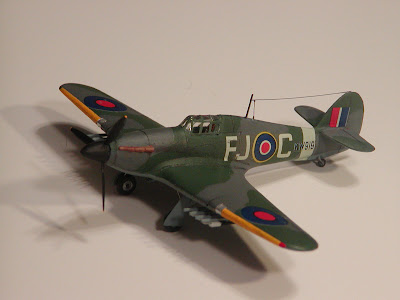
The rest of the construction was fairly straightforward. The classic Testor's 1172 Dark Sea Blue, mixed with a few drops of linseed oil, was used over the entire aircraft, brush painted. The interior color is Testor's Zinc Chromate, a bit more yellowish but pretty close. A seat was made from scrap plasticard with harnesses made from drafting tape. The propeller was also slightly modified in shape, closer to the prototype's, and painted (note; the author had managed to break the prop's shaft, and had to resort to creative repair. In the end, it was salvaged and spins just fine). Once satisfied, the blades were painted flat black, with a silver and red hub.
I tried to stick strictly to the kit's decals, however had to use a full set of national insignia for the fuselage due to the international orange band. The "I" on the tail and starboard wing top were made from the arrow decals found in the kit, as well as a spare set from another Testor's kit. The "51"'s were created from the "157" decals, again using a spare from the other kit for the wing. The final decal modification was adding the red bars to the insignia; this was done by painting scrap decal material flat red and cutting out the lengths needed. They had a somewhat ragged appearance, but anyone who works with color in the field will tell you, red fades very quickly. Once the decals had set, some mild weathering was done using Testor's Silver paint, and the entire model sprayed with Dullcote. 


The landing gear were detailed with new rear struts cut from florist's wire, while the kit struts were cut and moved up closer to the wing.


Finally, two antenna were added from the plasticard stock and painted to match. Also, the cowling was rotated so that not only did the cylinders match the drawings better, the top three flaps were sanded and filled, as there aren't any there on -1 Corsairs and blending that section of the cowling into the fuselage. This was actually done after the vast majority of the painting. The final touch was some modest weathering along the propeller blade leading edge. 
With that, the model was declared finished.


It makes an interesting companion piece to another Testor's Corsair built more or less straight from the kit.


For the price, the classic Testor's Corsair has plenty of potential, not only for the beginner but us seasoned builders as well.
Edit - One thing I did fail to mention is how the canopy was handled. While a proper -1D series Corsair had a hood that was frameless, I used the kit's canopy as is, simply not painting those frames. Admittedly, this was the lazy way out, but then again in 1977, replacement canopies were unheard of and I always had problems making my own. A minor problem, yes, but one which still exists, and which I openly acknowledge.

Tuesday, July 3, 2012

The Lindberg 1/72 F6F-5


When 1/72 scale began gaining in popularity here in the United States, every major plastic manufacturer jumped on board, producing an increasingly diverse variety of aircraft. Duplications were frequent, however; both Hawk and Revell made Wildcats and Corsairs, for instance. Revell's line, though, grew fast and fairly large and soon grew to cover many subjects, especially aircraft of the Second World War.
Not surprisingly, Revell could not cover every subject in that series, so they concentrated on popular subjects. For some reason, though, it fell to Lindberg to produce the most common fighter of the US Navy during World War II; the Hellcat.

Released in the mid-1960's, The 1/72 Lindberg F6F-5 Hellcat was superior to their older 1/48 kit but still rather typical of their earlier releases. While the basic shape is fairly close, it does have a good many rivets, as well as some dubious panel lines (raised) and sparse cockpit. The landing gear bays are slightly misshapen, though this can be corrected easily with knife and file. The canopy, though thick, is clear. The engine, though, is only a "bas relief" representation at best. The six .50 caliber guns are also noticeably missing. A total of twenty two pieces makes up the model, including the stand. Markings are for a generic ship, "24". Make no mistake, however; the canopy and cowling clearly mark this as a -5.
Can a decent model be made from this kit?
I had seen the kit since at least 1970, at the Pic-n-Save near our Brookview house. My first chance to find out as a teenager was botched when a younger family friend proceeded to build the model in front of my stunned eyes (he literally just picked the model up along with my one tube of Testor’s Non-Toxic Cement, which he applied liberally, as if with a trowel, whilst rambling on about girls, stock cars and other topics). When I was fourteen, my best friend Craig picked one up and followed the painting instructions to the letter (Testor's Pla Enamel, colors which, by the way, are still being made), landing gear up. I envied that blue bird.
Having just acquired the kit again, my first since 1975, I plan on seeing just what can be had with this blue bird. It has potential, which I plan to squeeze out.

Thursday, June 28, 2012

Testor's Quick Build F4U Corsair


Let's start off with the fact that this is not my first experience with this kit. In fact, I have another in the spares closet right now. Breanna and I built one back in late 2010. I had purchased it for her so she and I could build a couple of models together.
It was when I was helping her that I realized that this kit had plenty of potential.
First, though, are the flaws. To be clear, I do not consider the lack of landing gear to be amongst these. It has two antenna, the aft being woefully wrong. Second, the propeller is somewhat thin. There is a minor dihedral problem where the starboard wing is up slightly higher than the port. The most noticeable problem, though, is a clear lack of mark. The forward cowling looks as if it came off an AU-1, but it lacks the hardpoints under the wings. In other words, it has features of both an AU-1 and an F4U-5.
On the plus side, it has a fairly nice though simple interior. The engine, whilst incomplete, is adequate enough, and the panel lines are engraved, though perhaps a tad too deep. Still, it goes together very well (as a snap together model should) and is actually something of a joy to build. What must be remembered throughout, though, is that this is a kit meant for beginners and novices. 
I chose to build mine up as an F4U-5, which meant that the cheek intakes had to be added. This was done using scrap from a plastic receipt paper spool and some Squadron Green Putty (vile stuff that I really should avoid, to be honest, due to my chemical sensitivities).

The other modification to the airframe was the aft antenna; it was reshaped from a thick "T" to a more normal appearing type, though it will probably be deleted altogether. The model was finished in overall Testors Acryl gloss Dark Sea Blue. 
The markings included in the kit are for two birds, including an F4U-1D from VF-84, basically the same as for Testors re-pop of the classic Hawk kit. The other markings are for a much later bird though somewhat nondescript. They closest resemble those found on Corsairs stationed aboard the USS Wright. I chose to base their positions following the example found at the Vought Heritage site
The end result was certainly pleasing enough, especially when one considers that we are still in the midst of a move and a goodly amount of my tools are packed. 


Now, let's see what can be done with the other. 

Wednesday, June 23, 2010

Kit(s) of the Day - The MPC Profile Series


In the early 1970's, there were some indications that interest plastic model aircraft was waining on the western side of the Atlantic. This was probably for a variety of reasons, though the biggest was that many of those youngsters that had started building these kits in the 50's and 60's had now aged, and many of the gimmicks that were used to sell the kits back then were failing. In the UK, of course, it was a slightly different story, with both Airfix and Frog booming along.
MPC was known stateside mainly for model cars in 1/24 scale. In the mid-1960's, they began to import, and later produce, Airfix kits. They used some unusual methods to get people to buy their kits, such as including chromed parts and wild custom decals for a while.
Obviously, that didn't work.
So, they took what can only be described as a more English approach. In the UK, a series of booklets had been published for a while known simply as "Profile Publications". Each of these booklets contained information on a single aircraft or variant, complete with, you guessed it, full colour profiles. When I was young, I would stand, mesmerised, at the book rack in Art's Hobby Shop, staring at the vast number of them he carried.
Anyway, MPC decided to use the Profile booklets as a starting point for a new line of Airfix kits. Each kit would come with decals for three different aircraft, allowing the modeller to choose which aircraft he wanted. In a way, it was akin to the customising that American car modellers had enjoyed for a few years at that time. Some kits even came with parts to allow different variants to be built, though this could be traced back to the dies that Airfix had tooled originally.
Suffice to say, the new line of MPC kits were a hit.
They weren't perfect, however.
Take the Wildcat, for instance.

When this model was being sold by Airfix, it contained markings for two aircraft; one Fleet Air Arm, the other US Navy. The plane itself represents an FM-2, the very last Wildcat variant built (and made by General Motors, not Grumman). This plane was a bit different than the original F4F-3 or -4. That didn't stop MPC from including decals not only for an F4F-3, but for an even rarer G-36, Grumman's early export model that the British ended up with.
This wasn't the only time they dropped the ball where that was concerned.
Then, there were the decals. My biggest complaint for years was how light the blues tended to be. Other decals, namely from later kits, were printed on material that was very thick and refused to adhere to anything but a perfectly smooth, flat and very glossy surface.
Still, the Profile Series from MPC introduced many people to the hobby. They were usually sold very inexpensively at outlets ranging from convenience stores to department stores. The line finally faded from public view around the mid-1970's, with the author seeing the last few kits vanish from our local Woolco's around 1978.
For the collector, the boxes are pretty nice, with information lifted directly from the Profile booklets. Sometimes, the colour information on the instruction sheets left something to be desired. The models themselves were almost always moulded in white, though I have heard reports of other shades such as silver and light blue being used. Beyond that, they were still Airfix kits, though under cover.
MPC would once again become involved with Airfix in the early 1980's, when they produced a number of kits as Airfix was going through some difficulties. These were a far cry from the old Profile series, basically being American reboxing's only. This would be MPC's last foray into military models. By the end of the century, MPC itself would be gone, to emerge later as simply a brand name only.

Monday, June 21, 2010

Building the Classic Airfix Hurricane Mk.IV


I decided that it was time to put together the Airfix Hurricane Mk.IV, and to treat the model with respect. In doing so, I decided to use techniques and materials that a model builder in the early 1960's would have had access to. I chronicled the build at the Unofficial Airfix Modellers Forum, and the images are up at Picasa. To say the least, I am very happy with how this has turned out. In fact, this model looks better (to me) than many of my more modern kits.
Pleased I am!

Tuesday, June 15, 2010

The Great Spitfire Mk.I/II Quad Build of 2010


There are just some models that have to be built. You know the ones; they have been sitting in your collection for years. For me, it was my two Hasegawa Spitfire Mk. I's. I had planned on building one up as the Spitfire prototype, but there were too many issues.
The fact is, while these models look nice enough, they have numerous issues, the most noticeable being the lack of the "gull wing" underside.
Then in April of 2010 I located a Heller Mk.I.
With the purchase of the Heller kit, I decided to compare the different early Spitfire kits, which I of course had to blog about.
A couple of weeks later, I managed to obtain the Revell Spitfire Mk.II (really a Mk.I), primarily for its decals. Aside from the Frog kit (which is the oldest Mk.I Spitfire), I now had four classic birds.
That's when I decided to build them all simultaneously.
I chronicled the build at the Unofficial Airfix Tribute Forum and also posted the images on Picasa (link below).
Was it fun? Certainly. For a couple of weeks, I was fifteen again. Like all my builds, I build for myself and not for contests. This build may not have produced prize winning models, but it sure was nice to just build for the sake of the build.

Spitfire Quad Build

Friday, June 4, 2010

Modelology

If someone were just getting into plastic model aircraft today, they would be startled at the sheer abundance of kits. This was not always the case; when I built my first model airplane in 1970, there were mostly injection molded and vacuformed kits and conversions. Resin parts were still some time off, and while there were some metal components available, photo-etch was nascent.
For us, it was styrene stock, plasticard and what we could salvage from other sources. Decals were just coming into their own. We relied upon the manufacturers to provide us with usable kits.
Not that the manufacturers made it easier.
Often times, they had kits that were not carefully researched. Take for instance the classic Hawk SBD Dauntless. The kit came with markings for an SBD-3, circa 1942. The model also came with national markings molded into the model, by the way; I suppose one could go back and simply paint the roundels on. The problem is that, aside from being quite simple, the kit is actually an SBD-5 (which later Hawk kits actually claimed on the box art). The navy markings are simply wrong for that make. Converting it to an SBD-3 involved a little work, most notably adding that scoop to the top of the cowling.
Airfix, to their credit, did a better job than most for us 1/72 modellers. Many kits had optional parts (their original Hurricane Mk. II is literally a spares factory, with parts that they never bothered to provide markings for!). Their SBD kit contained parts for both a -3 and -5. If one wanted to model both aircraft accurately, you now had the ability to do so, perhaps even swapping the Airfix -3 cowling for the -5 cowling on the Hawk model (it boggles).
A few other companies jumped on the bandwagon, but the good folks at Airfix made it an art.
But, before I go off and make this an article about the thrill of collecting spare parts for the bin, let me get back to my main point. The parts article will be another time.
Many of these early manufacturers have to be forgiven for their occasional poor choices. Frequently, the access they had to information was scant and often plain wrong. Perhaps they had drawings for one aircraft variant but wanted to produce another. Then came the task of marketing the subject; they needed to make it popular. Hence the wrong markings on the Hawk Dauntless. The SBD-3 from the Battle of Midway was far more interesting than a later SBD-5, certainly braver. Hawk also did this again with their Spitfire F.Mk.22. The model represents an early Mk.22, probably a prototype based upon the fin, yet the markings seem to depict... nothing. The later Testors release of this kit repeats that sin; this is a plane that did not exist. But it is still an important variant and for many of us filled a void.
Frog was another company that made these faux pas quite often. They sold their first Spitfire (originally labeled a Mk.II) as a Mk.Ia/Va. There are minor differences between those variants, yet it allowed Frog to model two very important aircraft; a Mk.I from 19 Squadron and Douglas Bader's Mk.Va.
Lest we think that the trail ends there, that these older companies have been shuttered and their products relegated to the waste bin of history, they still live on, and not only in their influence. The Frog dies, for instance, were divided between Revell-Germany and Novo, a Russian company that has long since bellied up and given us Eastern Express. Not only that, but Frog's Spitfire Mk.I/Va seems to have influenced (if not, almost been copied by) PM Models Spitfire tropical Mk.Vb/Vc and all of its variations. While I've not seen it, I also suspect that the same might hold true for their Sea Fury. Academy of Korea has also copied a number of Frog kits, notably the Wildcat, P-40B, TBF and Lockheed Ventura. Many of the older Airfix dies have been acquired by Bilek, an eastern European concern. And, of course, many of Hawk's models live on through Testors, and lately Lindberg (which is a whole other subject).
That is what we had to work with back then.
This searching for the roots of these models and model building can be best described as "modelology", the science of styrene divination, the archaeology of the plastic model. This goes beyond simply collecting and comparing the kits to drawings and newer offerings. This also involves the building of the kits, using the techniques that would have been available to the average modeller of a given period, to see if, indeed, better models could be created. The period I've chosen is the mid-1970's to 1980. A model made after that point is subject to newer techniques, and indeed there are probably better models available. There may occasionally be better research and decals, as well as correcting the issues with colours (namely those pesky Luftwaffe aircraft), but if the model dates or was available during a given period, it should be built as if I were in that period.
There are a few compromises, though. I discovered acrylic based wood fillers in the 1980's, and they have been my filler of choice since, but otherwise work, for me, as well as the putties available in my youth. I also have to use non-toxic cement (the citrus smelling stuff) due to chemical sensitivities, but this has been available for a few decades now and indeed was used when I was a lad.
So, welcome to modelology, and enjoy modelling the way we used to. Feel free to set the resin and the photo-etch down now.